Step by Step Docker - Part 3
Docker Compose Essentials: Orchestrating Multi-Container Data Pipelines


Previously, I had made a post on the basics of Dockerfile, explaining the setup and ways of running containers on your own computer. However, we also ran into the issue of running multiple containers manually on the command line as one Docker file can only run one container.
Enter Docker Compose - your blueprint for orchestrating multi-container applications.
Docker Compose lets you define your entire application stack in a single YAML file: which services to run, how they connect, what volumes they need, and their startup dependencies, and you simply execute ‘docker-compose up’ to run all the required containers.
Docker Compose - Multi-Container Orchestrator
Docker Compose is a tool for defining and running multi-container applications using a single YAML configuration file. Instead of juggling multiple docker run commands with complex flags for networking, volumes, and dependencies, you declare all your services—your Python app, database, cache, and any other components—in one docker-compose.yml file.
With a simple docker-compose up, all your containers start together, properly networked and configured. It’s like having a recipe that not only describes each ingredient (your containers) but also how they should be combined and served together. Docker Compose handles the orchestration: starting containers in the right order, creating networks for inter-container communication, managing volumes for data persistence, and gracefully stopping everything when you’re done.
Something that would take five separate terminal commands and careful coordination now happens with one command, making your entire application stack portable, version-controlled, and reproducible across development, testing, and production environments.
Continuing from the previous post, let me demonstrate docker-compose by building a Pokemon data-pipeline with the below stack:
Python application scraping API data
A PostgreSQL database storing Pokemon database
Adminer to view the database
Docker-Compose structure
version: ‘3.8’

services:
  service-name:
    (image: username/repository:tag   # Pre-built image
                    or
    build: .                      # Path to Dockerfile)
    container_name: container-name
    ports:
      - “host-port:container-port”
    environment:
      ENV_VAR: value
    volumes:
      - ./host-path:/container-path
      - volume-name:/container-path
    networks:
      - network-name
    depends_on:
      - other-service

  other-service:
    image: image-name:tag
    container_name: container-name
    environment:
      ENV_VAR: value
    volumes:
      - volume-name:/container-path
    networks:
      - network-name

volumes:
  volume-name:

networks:
  network-name:
    driver: bridge
version: ‘3.8’Lets start with version. This tells Docker Compose which syntax and features are available in the file and is completely optional. We have included this only as best practice.
name: project-name      # Optional (custom project name)

services:               # Required (your containers)
  ...

volumes:                # Optional (named volumes)
  ...

networks:               # Optional (custom networks)
  ...

configs:                # Optional (configuration files, mainly for Swarm)
  ...

secrets:                # Optional (sensitive data, mainly for Swarm)
  ...
These are the outermost indents, which will contain all the required parts of a docker-compose file.
‘Services’ is the only required component, as it has all the containers that needs to be run.
‘name’ would have the name of the project.
‘volumes’ here declares the name of the volumes, as these will be used in services to set up the volumes for the containers.
‘networks’ as the name mentions are the networks through which the containers would connect. Here, it provides for customisation where you could decide what networks that containers can communicate through, enabling the creation of networking system within the app. Having multiple networks is actually a best practice for security and organization.
‘config’ and ‘secrets’ are usually used along with Docker Swarm. I am not too familiar with Docker Swarm so lets put this topic for another time.
Almost all Docker Compose files will always have a combination of ‘name’, ’services’, ‘volumes’ and ‘networks’.
services:
  service-name:
    (image: username/repository:tag   # Pre-built image
                    or
    build: .                      # Path to Dockerfile)
    container_name: container-name
    ports:
      - “host-port:container-port”
    environment:
      ENV_VAR: value
    volumes:
      - ./host-path:/container-path
      - volume-name:/container-path
    networks:
      - network-name
    depends_on:
      - other-service

  other-service:
    image: image-name:tag
    container_name: container-name
    environment:
      ENV_VAR: value
    volumes:
      - volume-name:/container-path
    networks:
      - network-name
Lets compare this to running a single image in the command line. I’ll post the syntax for docker run.
docker run \
  --rm \ # automatically removes container once container stops
  -d \ # runs container in detached mode (background)
  --name container-name \ # sets a custom name for the container
  -p host-port:container-port \ # maps/forwards port from host to container
  -v host-path:container-path \ # mounts a volume for data persistence
  -e ENV_VAR=value \ # sets environment variables
  --network network-name \ # connects container to specified network
  --restart unless-stopped \ # automatically restarts container unless manually stopped
  image-name:tag \
  [command]
You’ll notice a similarity between ‘services’ components and the docker run syntax. Putting them side to side, you’ll see the below.
docker run \                             │services:
││ --rm \                                │    service-name:
││ -d \                                  │         image: image-name:tag
                                         |         restart: unless-stopped
││ --name container-name \ (OR build: .) │         container_name: container-name
││ -p 8080:80 \                          │         ports:
                                         |             - “8080:80”
││ -v ./data:/app \                      │         volumes:
                                                       - ./data:/app
││ -e DATABASE_URL=postgres://... \ │ -  │         environment:
                                         |             DATABASE_URL: postgres://...
                                         |volumes:
                                         |    data:
││ --network my-network \                |networks:
                                         |    - my-network
││ --restart unless-stopped \ │ -
││ image-name:tag
To summarise, Docker compose is a collection of Docker Run in a single file. So now we get the convenience to run multiple containers with a single file. Let us construct the Docker-Compose file for our Pokemon application.
version: ‘3.8’

services:
  app:
    build: .                    # Builds from Dockerfile in current directory
    container_name: pokemon-app
    depends_on:
      - db
    environment:
      DB_HOST: db
      DB_NAME: pokemon
      DB_USER: postgres
      DB_PASSWORD: postgres
      DB_PORT: 5432
    volumes:
      - ./data:/app/data
    networks:
      - pokemon-network

  db:
    image: postgres:15-alpine   # Uses existing image (no build needed)
    container_name: pokemon-db
    environment:
      POSTGRES_DB: pokemon
      POSTGRES_USER: postgres
      POSTGRES_PASSWORD: postgres
    volumes:
      - postgres-data:/var/lib/postgresql/data
    ports:
      - “5434:5432”
    networks:
      - pokemon-network

  adminer:
    image: adminer              # Uses existing image (no build needed)
    container_name: pokemon-adminer
    ports:
      - “8080:8080”
    networks:
      - pokemon-network
    depends_on:
      - db

volumes:
  postgres-data:

networks:
  pokemon-network:
    driver: bridge
Now let’s create the python code and Dockerfile.
pokemon.py
import requests
import pandas as pd
from sqlalchemy import URL, create_engine
import psycopg2
import os

postgres_url = URL.create(
    “postgresql+psycopg2”,
    username=os.getenv(’DB_USER’),
    password=os.getenv(’DB_PASSWORD’),
    host=os.getenv(’DB_HOST’),
    database=os.getenv(’DB_NAME’),
)

print(f”\nConnecting to database...”)
print(f”Connection URL: {postgres_url}”)

engine = create_engine(postgres_url)

print(”✅ Database engine created”)

pokemon_url = ‘https://pokeapi.co/api/v2/pokemon’
pokemon_params = {
    ‘limit’:-1
}

pokemon_json = requests.get(url=pokemon_url,params=pokemon_params).json()

pokemon_df = pd.json_normalize(pokemon_json[’results’])

print(f”Fetched {len(pokemon_df)} Pokemon”)

print(”\nSaving to PostgreSQL...”)
pokemon_df.to_sql(’pokemon_table’, con=engine, if_exists=’replace’, index=False)
print(”Data saved to PostgreSQL!”)

print(”📊 Access Adminer at: http://localhost:8081”)
print(”   Server: db”)
print(”   Username: postgres”)
print(”   Password: postgres”)
print(”   Database: pokemon”)
print(”   Table: pokemon_table”)
Dockerfile
FROM python:3.13-slim

WORKDIR /app

COPY . .

RUN pip install -r requirements.txt

CMD [”python”, “pokemon.py”]
With all that done, let’s run ‘docker-compose up —build’.
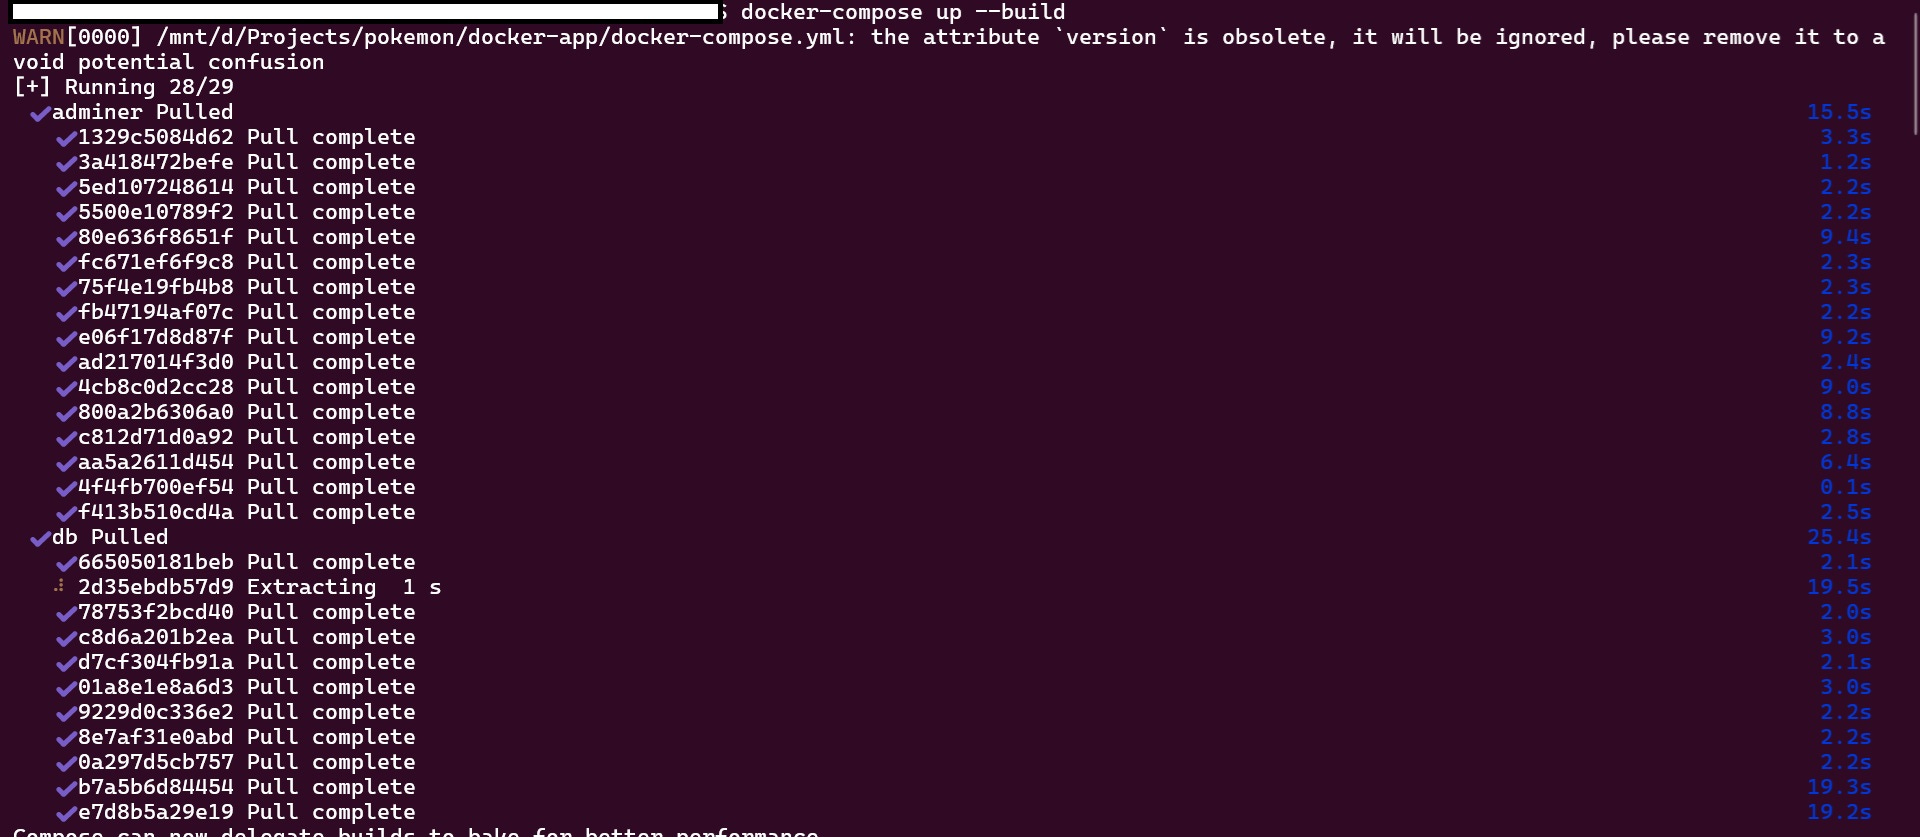
The images are first pulled since they do not exist locally.
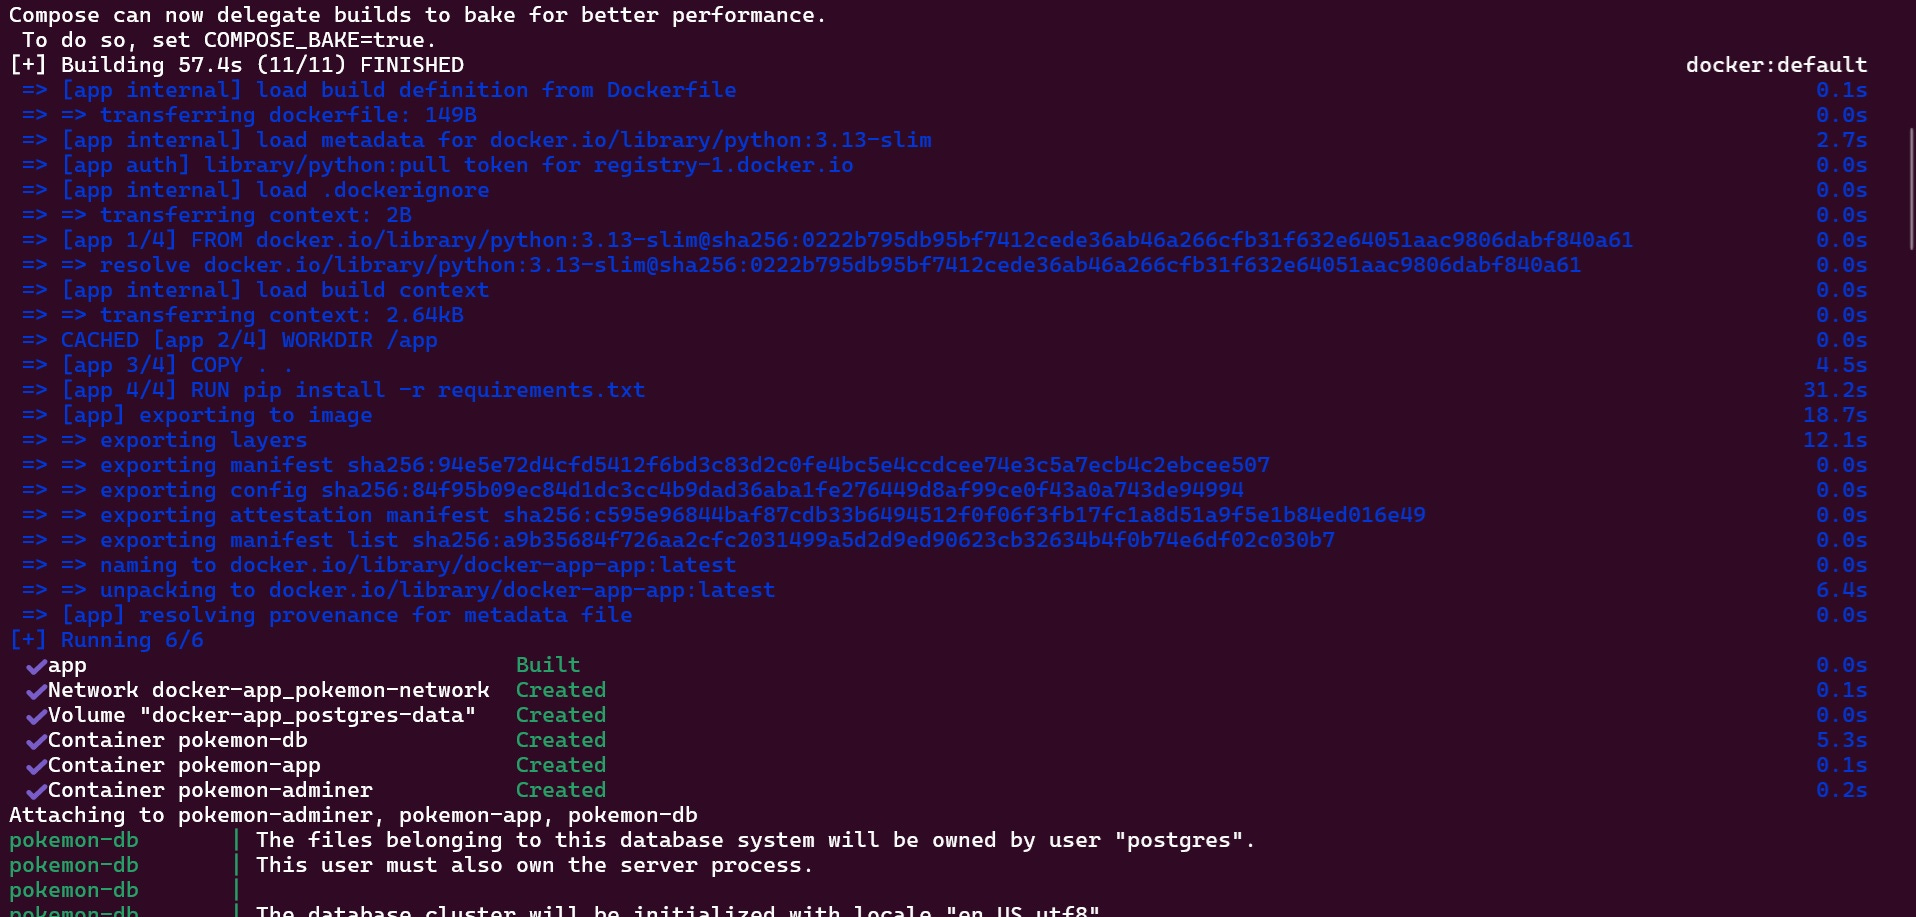
The Dockerfile is executed and container is built.
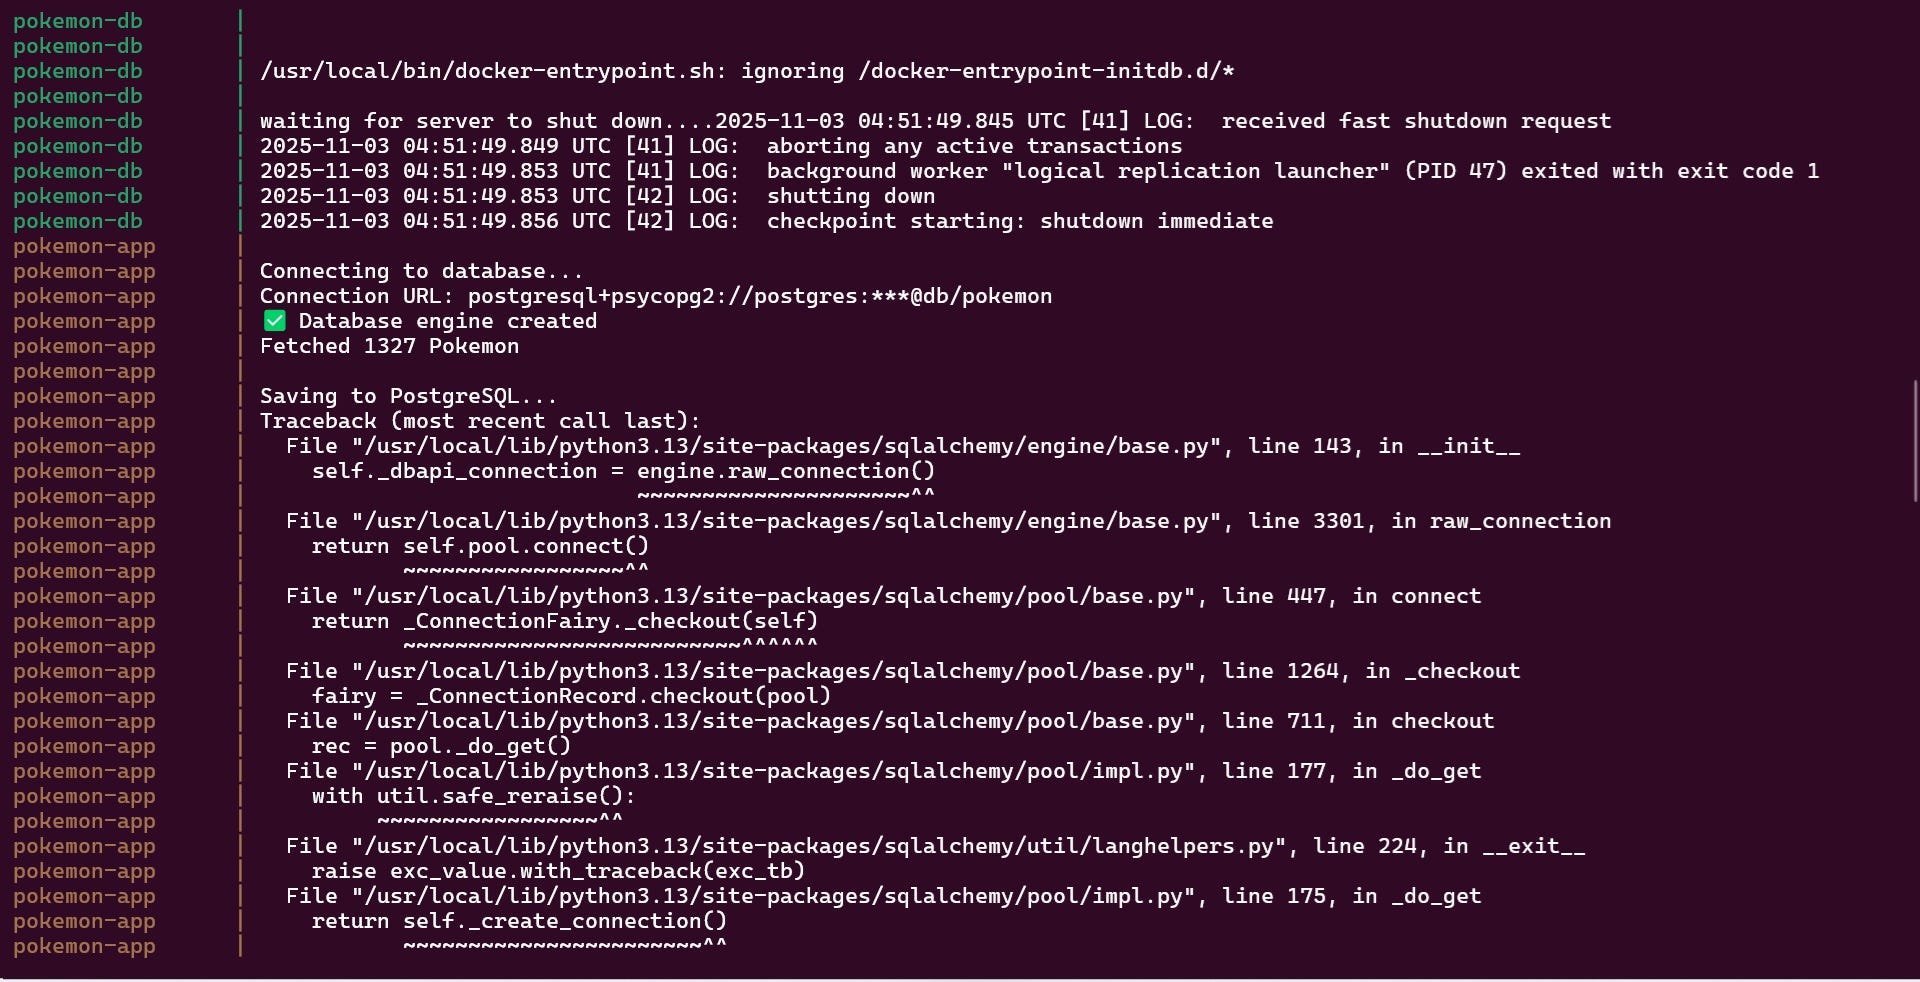
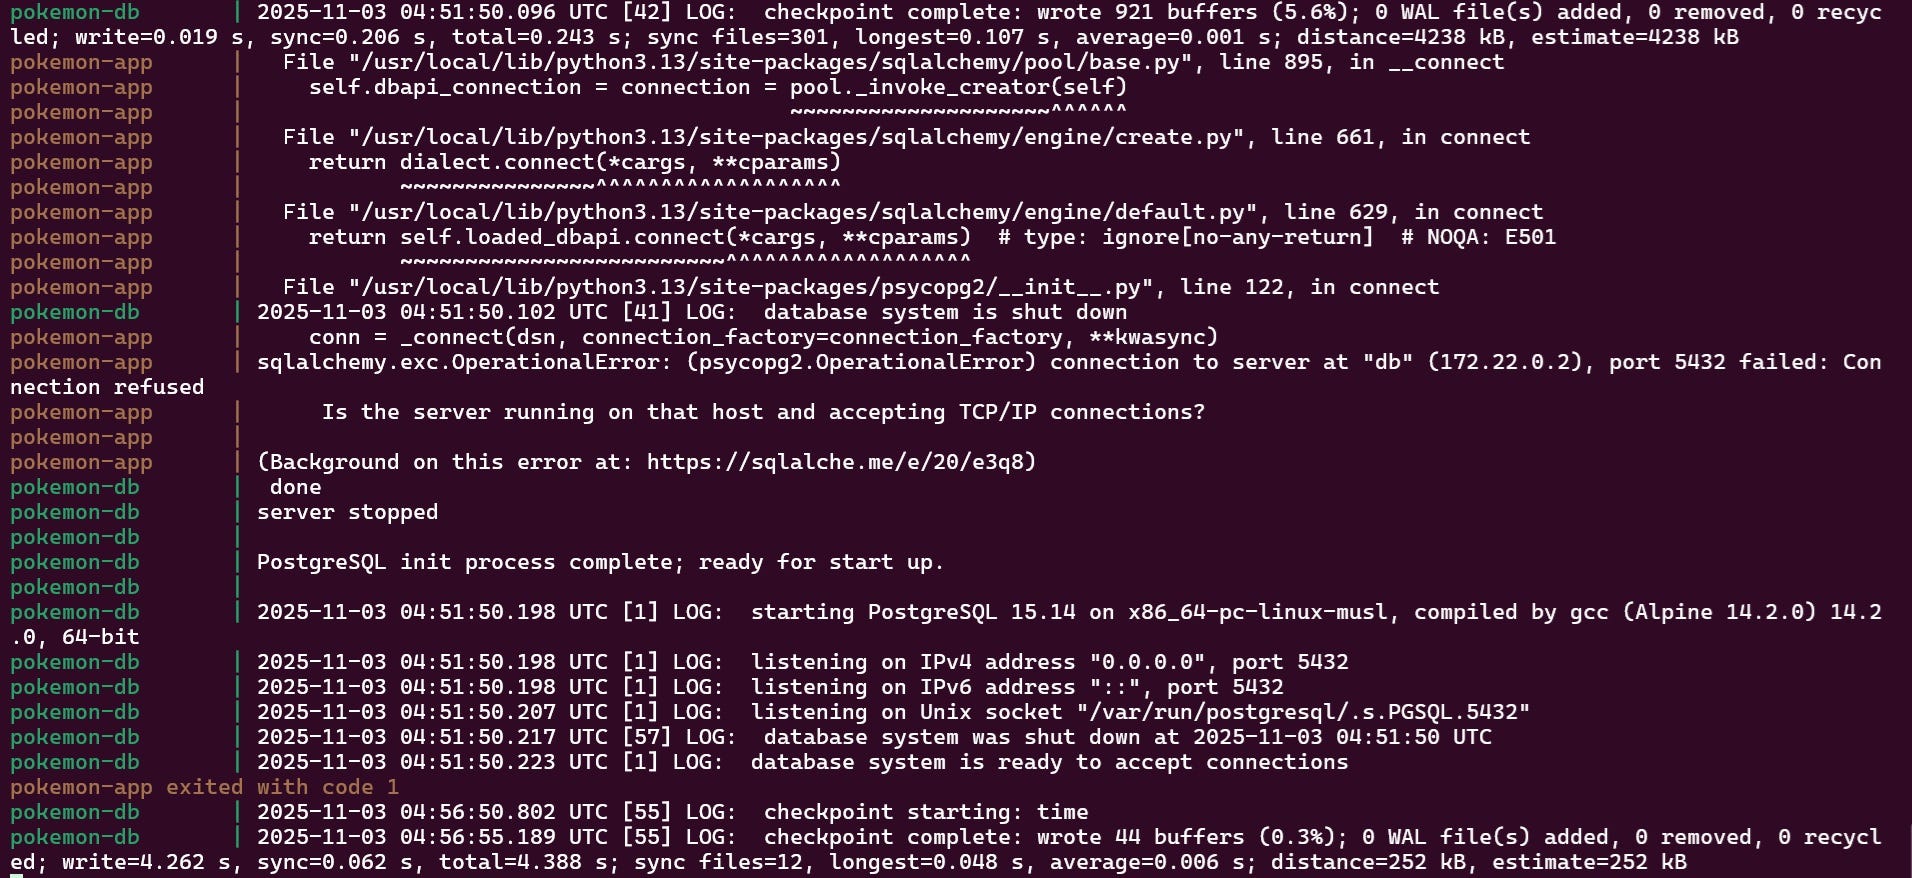
And my containers fail. This issue happens when containers do not execute in the correct timing. The python container executed even before the Postgres database is ready to receive connections. Lets make an adjustment to the service in the docker-compose file and python file.
services:
  app:
    build: .
    container_name: pokemon-app
    depends_on:
      db:
        condition: service_healthy  # ← Wait for healthy status
    environment:
      DB_HOST: db
      DB_NAME: pokemon
      DB_USER: postgres
      DB_PASSWORD: postgres
      DB_PORT: 5432
    volumes:
      - ./data:/app/data
    networks:
      - pokemon-network

  db:
    image: postgres:15-alpine
    container_name: pokemon-db
    environment:
      POSTGRES_DB: pokemon
      POSTGRES_USER: postgres
      POSTGRES_PASSWORD: postgres
    volumes:
      - postgres-data:/var/lib/postgresql/data
    ports:
      - 5434:5432
    networks:
      - pokemon-network
    healthcheck:  # ← Add healthcheck
      test: [”CMD-SHELL”, “pg_isready -U postgres”]
      interval: 5s
      timeout: 5s
      retries: 5
We have added healthcheck to the pokemon-db container to make sure that the db is ready and ‘condition : service_healthy’ to pokemon-app ‘depends-on’ component to make sure to execute only when db is ‘healthy’. Let’s try rerunning ‘docker-compose up —build’.
import requests
import pandas as pd
from sqlalchemy import URL, create_engine
import psycopg2
import os

postgres_url = URL.create(
    “postgresql+psycopg2”,
    username=os.getenv(’DB_USER’),
    password=os.getenv(’DB_PASSWORD’),
    host=os.getenv(’DB_HOST’),
    database=os.getenv(’DB_NAME’),
)

print(f”\nConnecting to database...”)
print(f”Connection URL: {postgres_url}”)

engine = create_engine(postgres_url)

print(”✅ Database engine created”)

pokemon_url = ‘https://pokeapi.co/api/v2/pokemon’
pokemon_params = {
    ‘limit’:-1
}

pokemon_json = requests.get(url=pokemon_url,params=pokemon_params).json()

pokemon_df = pd.json_normalize(pokemon_json[’results’])

print(f”Fetched {len(pokemon_df)} Pokemon”)

print(”\nSaving to PostgreSQL...”)
pokemon_df.to_sql(’pokemon_table’, con=engine, if_exists=’replace’, index=False)
print(”Data saved to PostgreSQL!”)

print(”Access Adminer at: http://localhost:8081”)
print(”   Server: db”)
print(”   Username: postgres”)
print(”   Password: postgres”)
print(”   Database: pokemon”)
print(”   Table: pokemon_table”)
We have also added a few print statements to the python file for debugging.
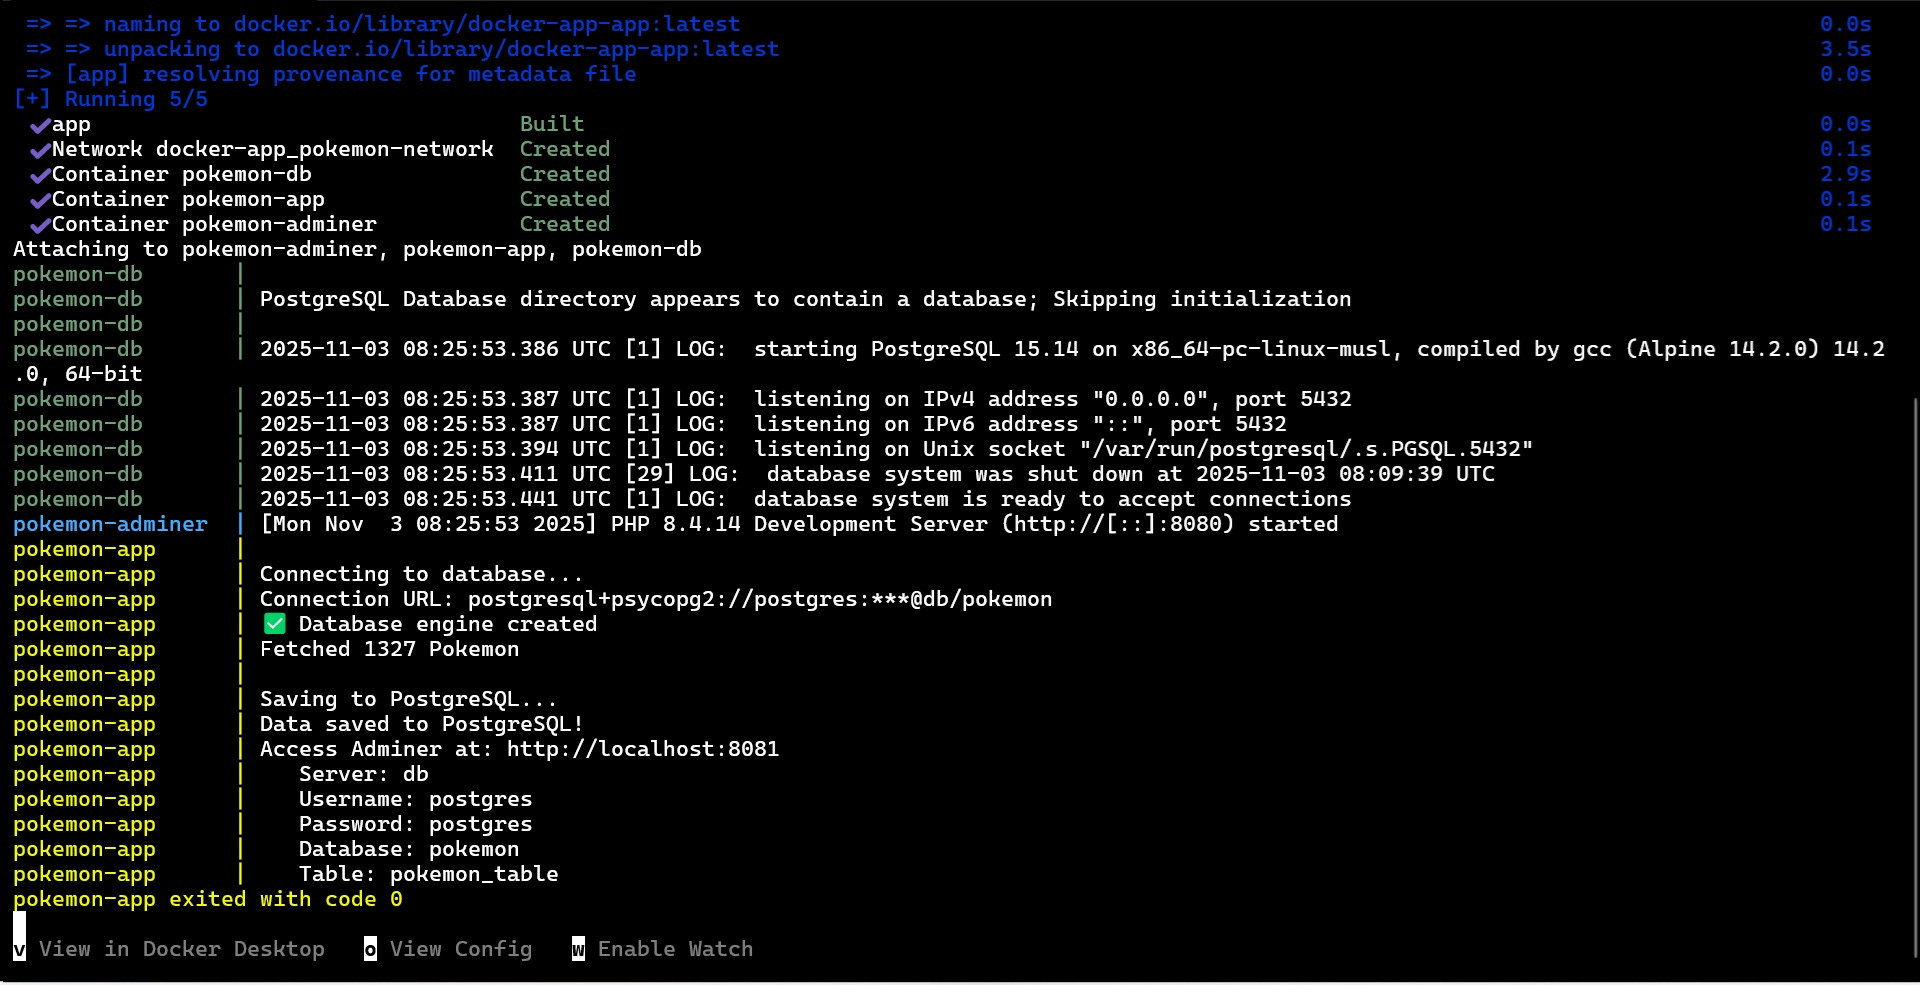
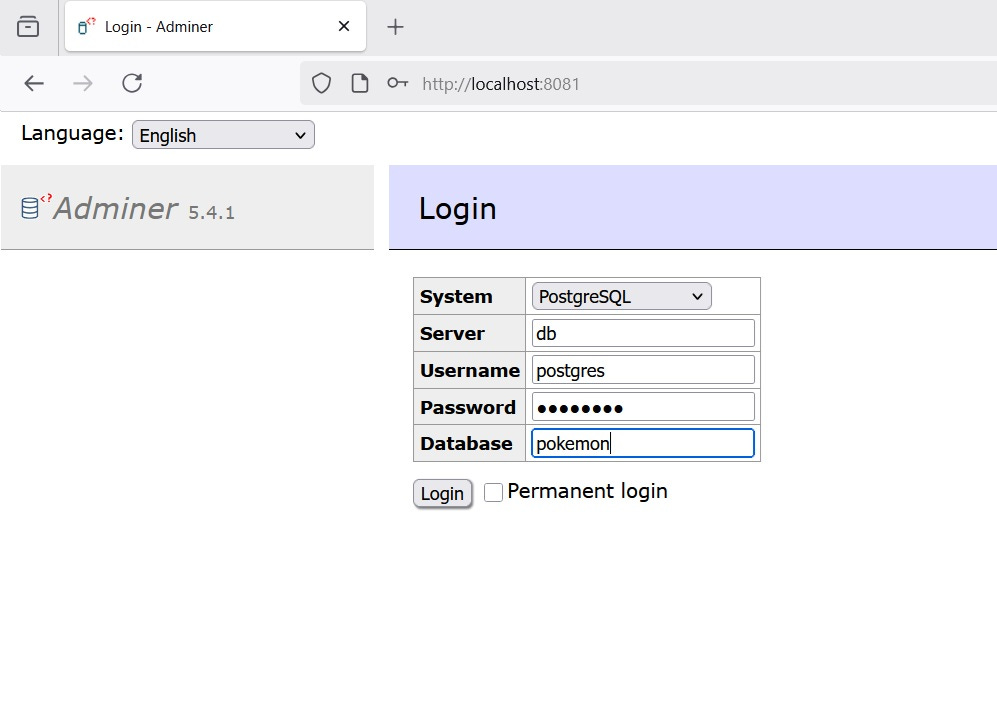
Now the containers execute in order and with correct timing. Let us now access the database on ‘localhost:8081’.

The table was created successfully and we can now query it through Adminer. Lets got with ‘SELECT * FROM pokemon_table LIMIT 10’.
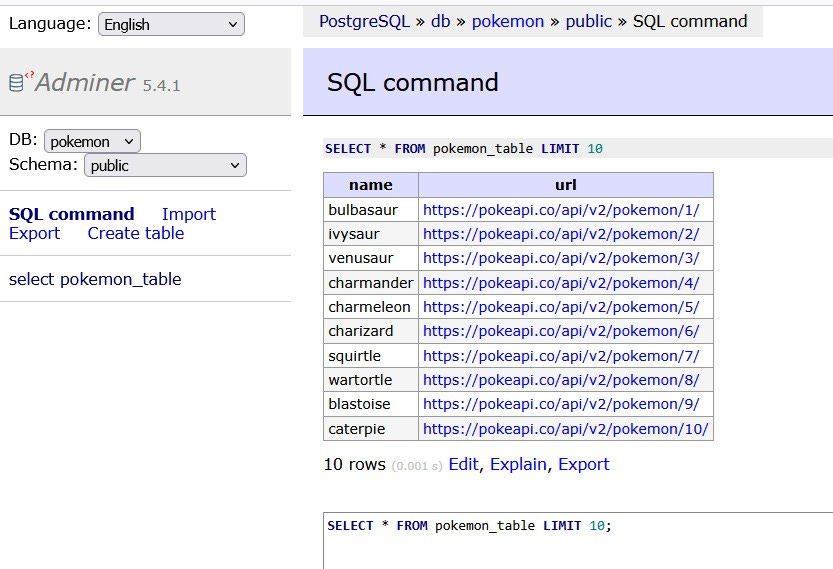
We can the first 10 pokemon in the database and also their respective links. All these functionality by executing only one line. There are more advanced customisation that can be done with docker-compose. Applications like airflow provide their own docker-compose files that can be downloaded and used immediately!
Wrapping Up: Your Docker Journey
Congratulations! You’ve completed the Docker fundamentals trilogy. Let’s recap what we’ve covered:
Part 1: Docker Basics - You learned to run containers, pull images from Docker Hub, and understand the core concept of containerization.
Part 2: Dockerfile Essentials - You moved from consumer to creator, building custom images with your own specifications and dependencies.
Part 3: Docker Compose - You’ve now orchestrated multi-container applications, managing databases, apps, and admin tools working together seamlessly.
What started with running a simple docker run command has evolved into managing complex, production-ready application stacks—all with version-controlled configuration files.
What’s Next?
Now that you have the Docker fundamentals down, here are some directions to explore:
Set up Apache Airflow with Docker Compose for workflow orchestration
Build data pipelines with containers for Python, Spark, and databases
Create reproducible data science environments
Keep Building!
The best way to master Docker is to use it. Try dockerizing your existing projects, experiment with different tech stacks, and explore the vast ecosystem of available images on Docker Hub.
Docker has fundamentally changed how we build, ship, and run applications. You’re now equipped with the knowledge to leverage this powerful technology in your own projects.
Happy containerizing!
Resources:
This concludes the Docker series. If you found this helpful, feel free to share your Docker projects or questions in the comments below!
Thank you for reading! If you found this interesting, do consider following me and subscribing to my latest articles. Catch me on LinkedIn.